大家好,我是大明哥,这次我们来看看NIO的第二个组件:Channel。
上篇文章[【死磕 NIO】— 深入分析Buffer]介绍了 NIO 中的 Buffer,Buffer 我们可以认为他是装载数据的容器,有了容器,还需要传输数据的通道才能完成数据的传输,这个通道就是今天要介绍的 Channel。
Channel 我们可以认为它是本地 I/O 设备、网络 I/O 的通信桥梁,只有搭建了这座桥梁,数据才能被写入 Buffer 。
Channel
在 NIO 中,Channel 和 Buffer 是相辅相成的,我们只能从 Channel 读取数据到 Buffer 中,或者从 Buffer 写入数据到 Channle,如下图:
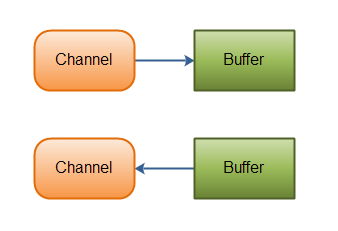
Channel 类似于 OIO 中的流(Stream),但是又有所区别:
- 流是单向的,但 Channel 是双向的,可读可写。
- 流是阻塞的,但 Channle 可以异步读写。
- 流中的数据可以选择性的先读到缓存中,而 Channel 的数据总是要先读到一个 Buffer 中,或从 Buffer 中写入,如上图。
NIO 中通过 Channel 封装了对数据源的操作,通过 Channel 我们可以操作数据源,但是又不必关注数据源的具体物理结构,这个数据源可以是文件,也可以是socket。
Channel 的接口定义如下:
public interface Channel extends Closeable {

    public boolean isOpen();

    public void close() throws IOException;
}
Channel 接口仅定义两个方法:
isOpen():Channel 是否打开close():关闭 Channel
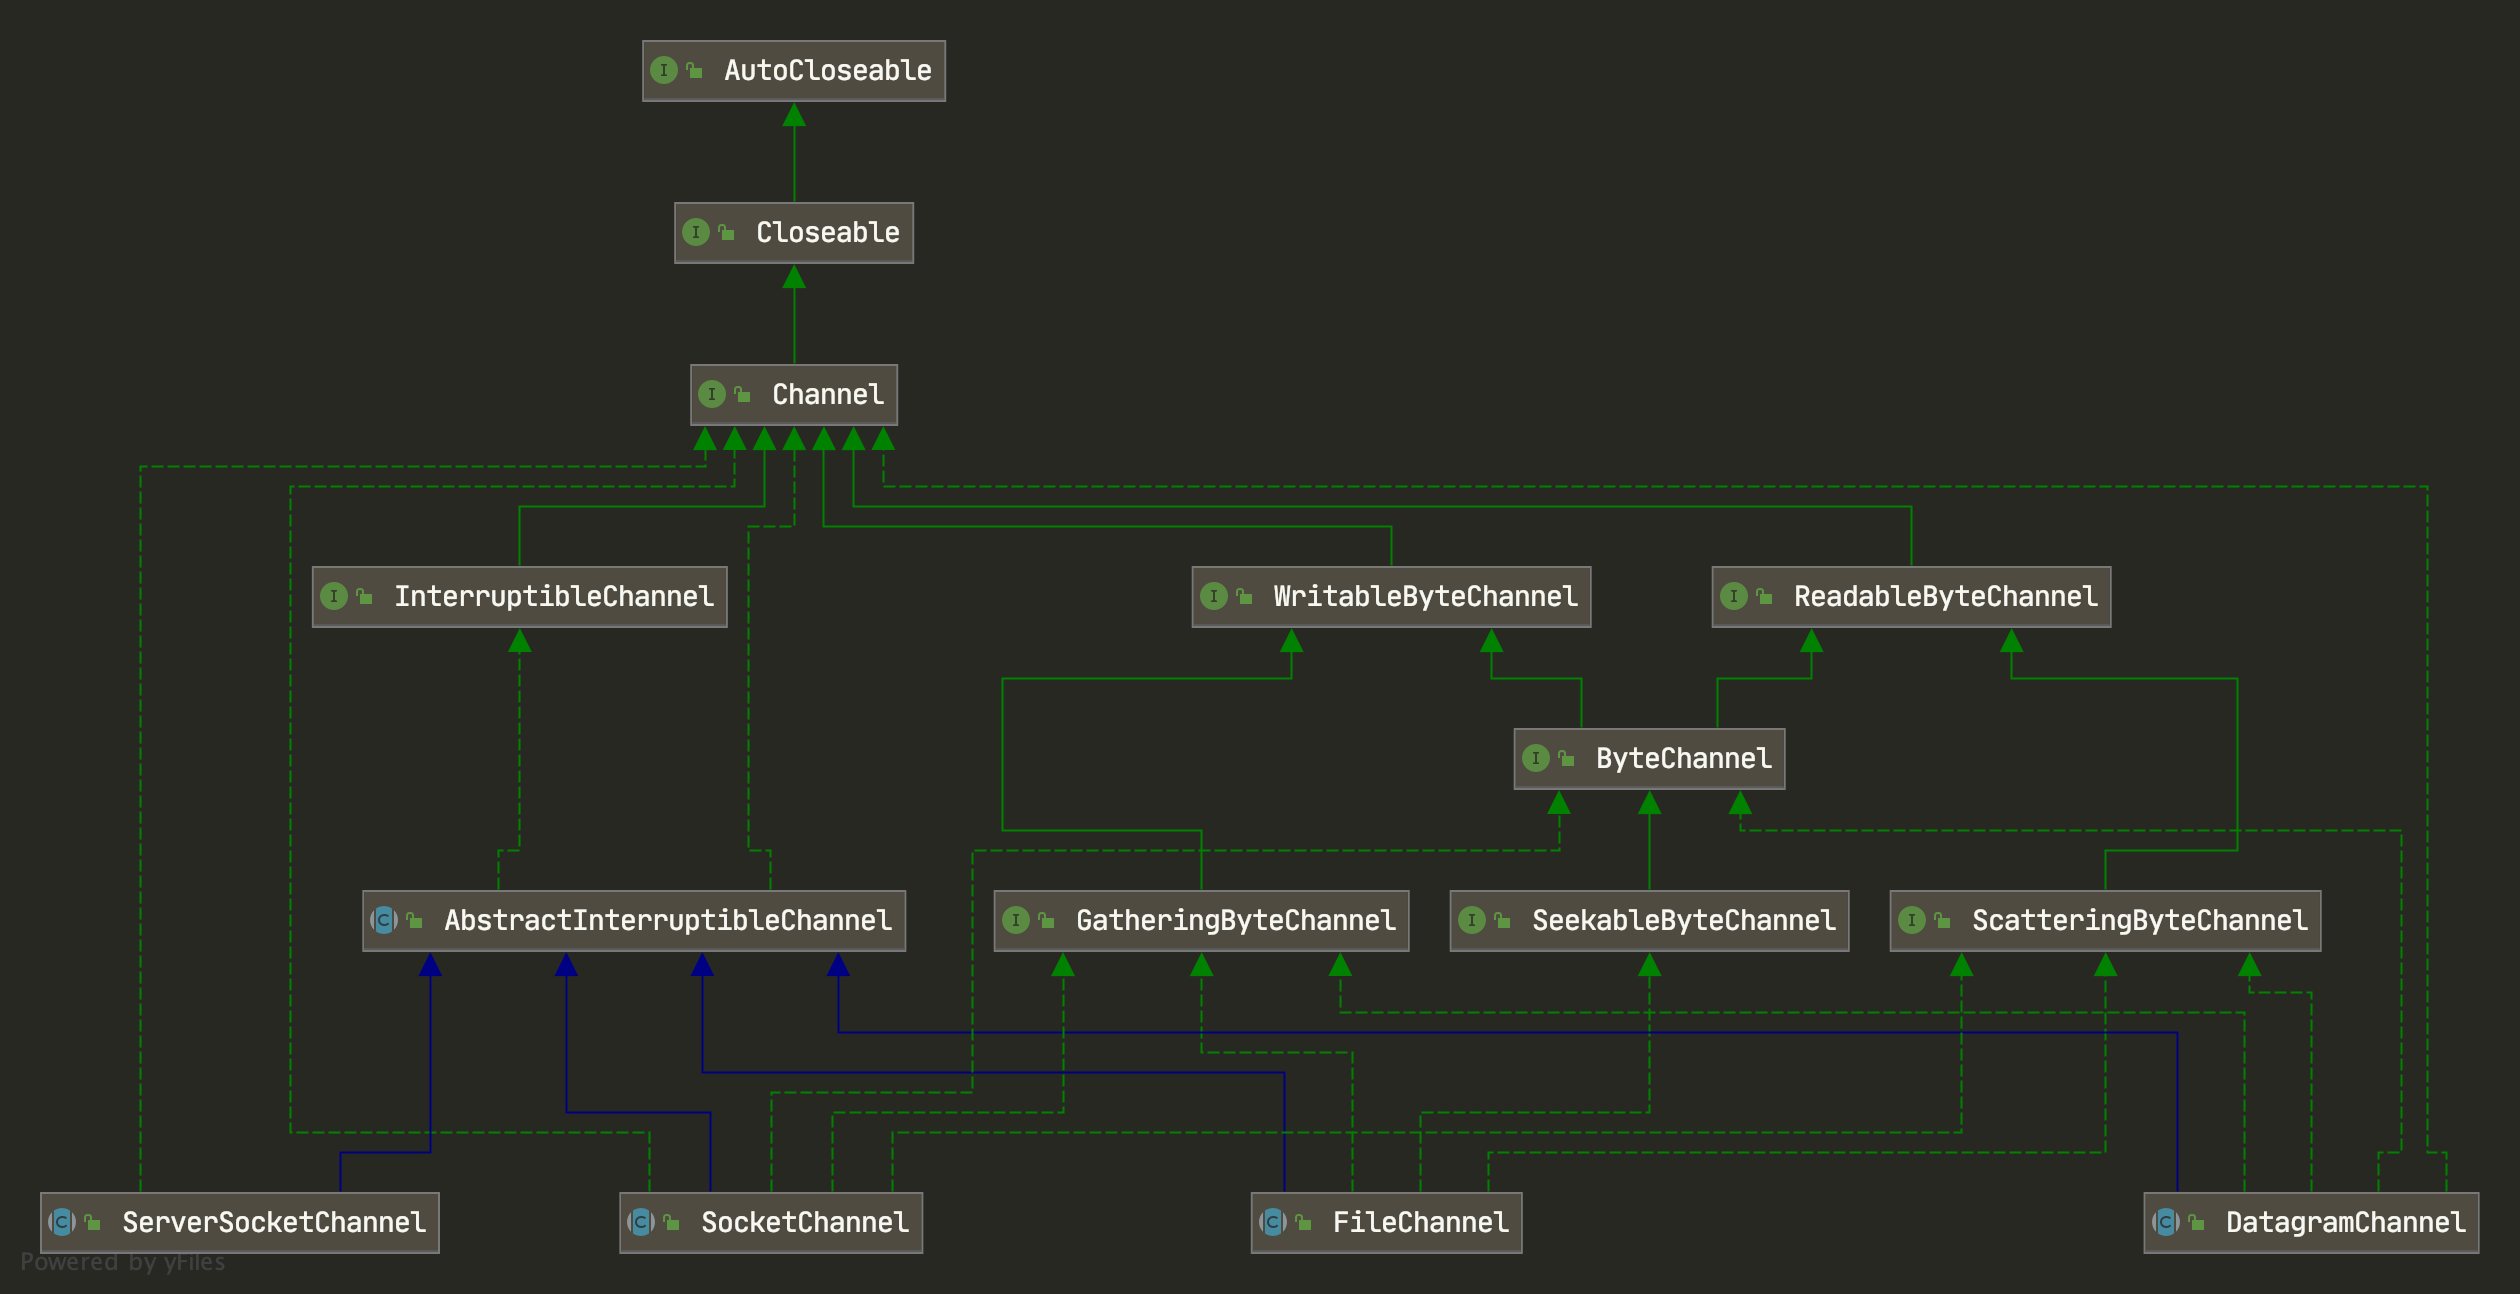
它的主要实现有:
- FileChannel:文件通道,用于文件的数据读写。
- SocketChannel:套接字通道,能通过 TCP 读写网络中的数据。
- ServerSocketChannel:服务器套接字通道,监听新进来的 TCP 连接,像 web 服务器那样,对每一个新进来的连接都会创建一个 SocketChannel。
- DatagramChannel:数据报通道,能通过 UDP 读写网络中的数据。
基本类图如下:
下面就 FileChannel 做详细介绍。
FileChannel
FileChannel 主要是用来读写和映射一个系统文件的 Channel,它是一个抽象类,具体由 FileChannelImpl 来实现。
定义如下:
package java.nio.channels;

public abstract class FileChannel
    extends AbstractInterruptibleChannel
    implements SeekableByteChannel, GatheringByteChannel, ScatteringByteChannel{
    /**
     * 初始化一个无参构造器.
     */
    protected FileChannel() { }

    //打开或创建一个文件,返回一个文件通道来访问文件
    public static FileChannel open(Path path,
                                   Set<? extends OpenOption> options,
                                   FileAttribute<?>... attrs)
        throws IOException
    {
        FileSystemProvider provider = path.getFileSystem().provider();
        return provider.newFileChannel(path, options, attrs);
    }

    private static final FileAttribute<?>[] NO_ATTRIBUTES = new FileAttribute[0];

    //打开或创建一个文件,返回一个文件通道来访问文件
    public static FileChannel open(Path path, OpenOption... options)
        throws IOException
    {
        Set<OpenOption> set = new HashSet<OpenOption>(options.length);
        Collections.addAll(set, options);
        return open(path, set, NO_ATTRIBUTES);
    }

  //从这个通道读入一个字节序列到给定的缓冲区
    public abstract int read(ByteBuffer dst) throws IOException;

    //从这个通道读入指定开始位置和长度的字节序列到给定的缓冲区
    public abstract long read(ByteBuffer[] dsts, int offset, int length)
        throws IOException;

    /**
     * 从这个通道读入一个字节序列到给定的缓冲区
     */
    public final long read(ByteBuffer[] dsts) throws IOException {
        return read(dsts, 0, dsts.length);
    }

    /**
     * 从给定的缓冲区写入字节序列到这个通道
     */
    public abstract int write(ByteBuffer src) throws IOException;

    /**
     * 从给定缓冲区的子序列向该信道写入字节序列
     */
    public abstract long write(ByteBuffer[] srcs, int offset, int length)
        throws IOException;

    /**
     * 从给定的缓冲区写入字节序列到这个通道
     */
    public final long write(ByteBuffer[] srcs) throws IOException {
        return write(srcs, 0, srcs.length);
    }

    /**
     * 返回通道读写缓冲区中的开始位置
     */
    public abstract long position() throws IOException;

    /**
     * 设置通道读写缓冲区中的开始位置
     */
    public abstract FileChannel position(long newPosition) throws IOException;

    /**
     * 返回此通道文件的当前大小
     */
    public abstract long size() throws IOException;

    /**
     * 通过指定的参数size来截取通道的大小
     */
    public abstract FileChannel truncate(long size) throws IOException;

    /**
     * 强制将通道中的更新文件写入到存储设备(磁盘等)中
     */
    public abstract void force(boolean metaData) throws IOException;

    /**
     * 将当前通道中的文件写入到可写字节通道中
   * position就是开始写的位置,long就是写的长度
     */
    public abstract long transferTo(long position, long count,
                                    WritableByteChannel target)
        throws IOException;

    /**
     * 将当前通道中的文件写入可读字节通道中
   * position就是开始写的位置,long就是写的长度
     */
    public abstract long transferFrom(ReadableByteChannel src,
                                      long position, long count)
        throws IOException;

    /**
     * 从通道中读取一系列字节到给定的缓冲区中
   * 从指定的读取开始位置position处读取
     */
    public abstract int read(ByteBuffer dst, long position) throws IOException;

    /**
     * 从给定的缓冲区写入字节序列到这个通道
     * 从指定的读取开始位置position处开始写
     */
    public abstract int write(ByteBuffer src, long position) throws IOException;


    // -- Memory-mapped buffers --

    /**
     * 一个文件映射模式类型安全枚举
     */
    public static class MapMode {

        //只读映射模型
        public static final MapMode READ_ONLY
            = new MapMode("READ_ONLY");

        //读写映射模型
        public static final MapMode READ_WRITE
            = new MapMode("READ_WRITE");

        /**
         * 私有模式(复制在写)映射
         */
        public static final MapMode PRIVATE
            = new MapMode("PRIVATE");

        private final String name;

        private MapMode(String name) {
            this.name = name;
        }
    }

    /**
     * 将该通道文件的一个区域直接映射到内存中
     */
    public abstract MappedByteBuffer map(MapMode mode,
                                         long position, long size)
        throws IOException;

    /**
     * 获取当前通道文件的给定区域上的锁
   * 区域就是从position处开始,size长度
   * shared为true代表获取共享锁,false代表获取独占锁
     */
    public abstract FileLock lock(long position, long size, boolean shared)
        throws IOException;

    /**
     * 获取当前通道文件上的独占锁
     */
    public final FileLock lock() throws IOException {
        return lock(0L, Long.MAX_VALUE, false);
    }

    /**
     * 尝试获取给定的通道文件区域上的锁
     * 区域就是从position处开始,size长度
   * shared为true代表获取共享锁,false代表获取独占锁
     */
    public abstract FileLock tryLock(long position, long size, boolean shared)
        throws IOException;

    /**
     * 尝试获取当前通道文件上的独占锁
     */
    public final FileLock tryLock() throws IOException {
        return tryLock(0L, Long.MAX_VALUE, false);
    }

}
打开 FileChannel
在使用 FileChannle 之前我们必须要先打开它,但是我们无法直接打开一个 FileChannel,需要通过使用一个 InputStream、OutputStream、RandomAcessFile 来获取一个 FileChannel 实例,如下:
RandomAccessFile accessFile = new RandomAccessFile("/Users/chenssy/Documents/FileChannel.txt","rw");
FileChannel fileChannel = accessFile.getChannel();
调用 getChannel() 即可获取 FileChannel 实例,源码如下:
public final FileChannel getChannel() {
    synchronized (this) {
        if (channel == null) {
            channel = FileChannelImpl.open(fd, path, true, rw, this);
        }
        return channel;
    }
}
getChnnel() 方法很简单,直接调用 FileChannelImpl 的静态方法 open():
public static FileChannel open(Path path,
        Set<? extends OpenOption> options,
        FileAttribute<?>... attrs) throws IOException{
    FileSystemProvider provider = path.getFileSystem().provider();
    return provider.newFileChannel(path, options, attrs);
}
从 FileChannel 读数据
调用 FileChannel 的 read() 方法即可从 FileChannel 中获取数据,当然不是直接获取,而是需要先写入到 Buffer 中,所以调用 read() 之前,我们需要分配一个 Buffer,然后调用 read() ,该方法返回 int 表示有多少数据读取到了 Buffer 中了,如果返回 -1 表示已经到文件末尾了。
ByteBuffer buffer = ByteBuffer.allocate(1024);
int readCount = fileChannel.read(buffer);
FileChannel 仅定义了方法,具体实现在 FileChannelImpl,如下:
public int read(ByteBuffer dst) throws IOException {
    ensureOpen();
    if (!readable)
        throw new NonReadableChannelException();
        // 加锁
    synchronized (positionLock) {
        int n = 0;
        int ti = -1;
        try {
            begin();
            ti = threads.add();
            if (!isOpen())
                return 0;
            do {
                // 通过IOUtil.read实现
                n = IOUtil.read(fd, dst, -1, nd);
            } while ((n == IOStatus.INTERRUPTED) && isOpen());
            return IOStatus.normalize(n);
        } finally {
            threads.remove(ti);
            end(n > 0);
            assert IOStatus.check(n);
        }
    }
}
- 首先确保该 Channel 是打开的
- 然后加锁,主要是因为写入缓冲区需要保证线程安全
- 最后通过
IOUtils.read()实现
static int read(FileDescriptor fd, ByteBuffer dst, long position, NativeDispatcher nd) throws IOException
{
    // 1 申请一块临时堆外DirectByteBuffer
    ByteBuffer bb = Util.getTemporaryDirectBuffer(dst.remaining());
    try {
        // 2 先往DirectByteBuffer写入数据,提高效率
        int n = readIntoNativeBuffer(fd, bb, position, nd);
        bb.flip();
        if (n > 0)
            // 3 再拷贝到传入的buffer
            dst.put(bb);
        return n;
    } finally {
        Util.offerFirstTemporaryDirectBuffer(bb);
    }
}
- 首先申请一块临时的堆外 DirectByteBuffer
- 然后先往 DirectByteBuffer 写入数据,因为这样能够提高效率,为什么会提高效率,我们后文分析。
- 最后拷贝到 ByteBuffer 中
写数据到 FileChannel
read()方法是从 FileChannel 中读取数据,那 write()方法则是从 ByteBuffer中读取数据写入到 Channel 中。调用 write() 需要先申请一个 ByteBuffer ,如下:
ByteBuffer buffer = ByteBuffer.allocate(1024);
fileChannel.write(buffer);
同样,实现是在 FileChannelImpl 中。
public int write(ByteBuffer src) throws IOException {
    ensureOpen();
    if (!writable)
        throw new NonWritableChannelException();
    synchronized (positionLock) {
        int n = 0;
        int ti = -1;
        try {
            begin();
            ti = threads.add();
            if (!isOpen())
                return 0;
            do {
                n = IOUtil.write(fd, src, -1, nd);
            } while ((n == IOStatus.INTERRUPTED) && isOpen());
            return IOStatus.normalize(n);
        } finally {
            threads.remove(ti);
            end(n > 0);
            assert IOStatus.check(n);
        }
    }
}
与 read() 方法实现一模一样,先确定该 Channel 是打开的,然后加锁,最后调用 IOUtil 的 write() 。
static int write(FileDescriptor fd, ByteBuffer src, long position, NativeDispatcher nd)
   throws IOException
{
   if (src instanceof DirectBuffer)
       return writeFromNativeBuffer(fd, src, position, nd);

   int pos = src.position();
   int lim = src.limit();
   assert (pos <= lim);
   int rem = (pos <= lim ? lim - pos : 0);
   // 2 否则构造一块跟传入缓冲区一样大小的DirectBuffer
   ByteBuffer bb = Util.getTemporaryDirectBuffer(rem);
   try {
       bb.put(src);
       bb.flip();
       src.position(pos);

       // 3 调用writeFromNativeBuffer读取
       int n = writeFromNativeBuffer(fd, bb, position, nd);
       if (n > 0) {
           // now update src
           src.position(pos + n);
       }
       return n;
   } finally {
       Util.offerFirstTemporaryDirectBuffer(bb);
   }
}
- 首先判断传入的 Buffer 是否为 DirectBuffer,如果是的话,就直接写入
- 否则则构造一块跟传入 Buffer 一样大小的 DirectBuffer
- 最后调用
writeFromNativeBuffer()
关闭 FileChannel
保持好习惯,用完了一定要记得关闭:close()。
public final void close() throws IOException {
    synchronized (closeLock) {
        if (!open)
            return;
        open = false;
        implCloseChannel();
    }
}
调用 implCloseChannel() 释放 Channel。
protected void implCloseChannel() throws IOException {
    // 释放文件锁
    if (fileLockTable != null) {
        for (FileLock fl: fileLockTable.removeAll()) {
            synchronized (fl) {
                if (fl.isValid()) {
                    //释放锁
                    nd.release(fd, fl.position(), fl.size());
                    ((FileLockImpl)fl).invalidate();
                }
            }
        }
    }
    // 通知当前通道所有被阻塞线程
    threads.signalAndWait();
    if (parent != null) {
        ((java.io.Closeable)parent).close();
    } else {
        nd.close(fd);
    }
}
关闭 FileChannel 时,需要释放所有锁和文件流。
示例
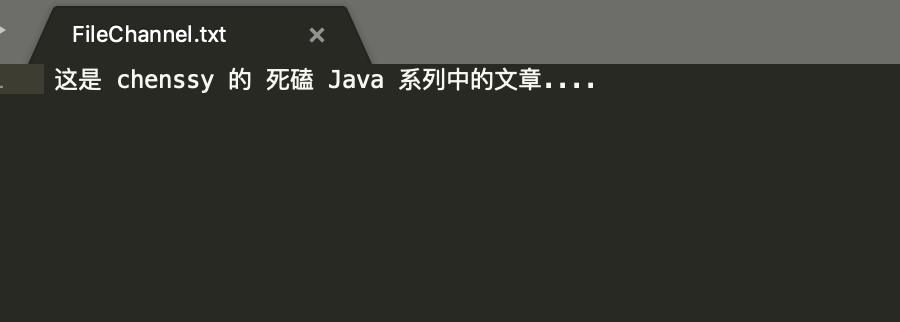
读数据
public static void main(String[] args) throws Exception {
    RandomAccessFile accessFile = new RandomAccessFile("/Users/chenssy/Documents/FileChannel.txt","rw");
    FileChannel fileChannel = accessFile.getChannel();

    ByteBuffer buffer = ByteBuffer.allocate(1024);
    fileChannel.read(buffer);
    System.out.println(new String(buffer.array()));
    fileChannel.close();
}
运行结果:

写数据
public static void main(String[] args) throws Exception {
    String fileContent = "这是 chenssy 的 死磕 Java 系列中的文章....";
    RandomAccessFile accessFile = new RandomAccessFile("/Users/chenssy/Documents/FileChannel.txt","rw");
    FileChannel fileChannel = accessFile.getChannel();

    ByteBuffer buffer = ByteBuffer.allocate(1024);
    buffer.put(fileContent.getBytes("UTF-8"));
    buffer.flip();
    fileChannel.write(buffer);
    fileChannel.close();
}
运行结果:
参考资料
Java 面试宝典是大明哥全力打造的 Java 精品面试题,它是一份靠谱、强大、详细、经典的 Java 后端面试宝典。它不仅仅只是一道道面试题,而是一套完整的 Java 知识体系,一套你 Java 知识点的扫盲贴。
它的内容包括:
- 大厂真题:Java 面试宝典里面的题目都是最近几年的高频的大厂面试真题。
- 原创内容:Java 面试宝典内容全部都是大明哥原创,内容全面且通俗易懂,回答部分可以直接作为面试回答内容。
- 持续更新:一次购买,永久有效。大明哥会持续更新 3+ 年,累计更新 1000+,宝典会不断迭代更新,保证最新、最全面。
- 覆盖全面:本宝典累计更新 1000+,从 Java 入门到 Java 架构的高频面试题,实现 360° 全覆盖。
- 不止面试:内容包含面试题解析、内容详解、知识扩展,它不仅仅只是一份面试题,更是一套完整的 Java 知识体系。
- 宝典详情:https://www.yuque.com/chenssy/sike-java/xvlo920axlp7sf4k
- 宝典总览:https://www.yuque.com/chenssy/sike-java/yogsehzntzgp4ly1
- 宝典进展:https://www.yuque.com/chenssy/sike-java/en9ned7loo47z5aw
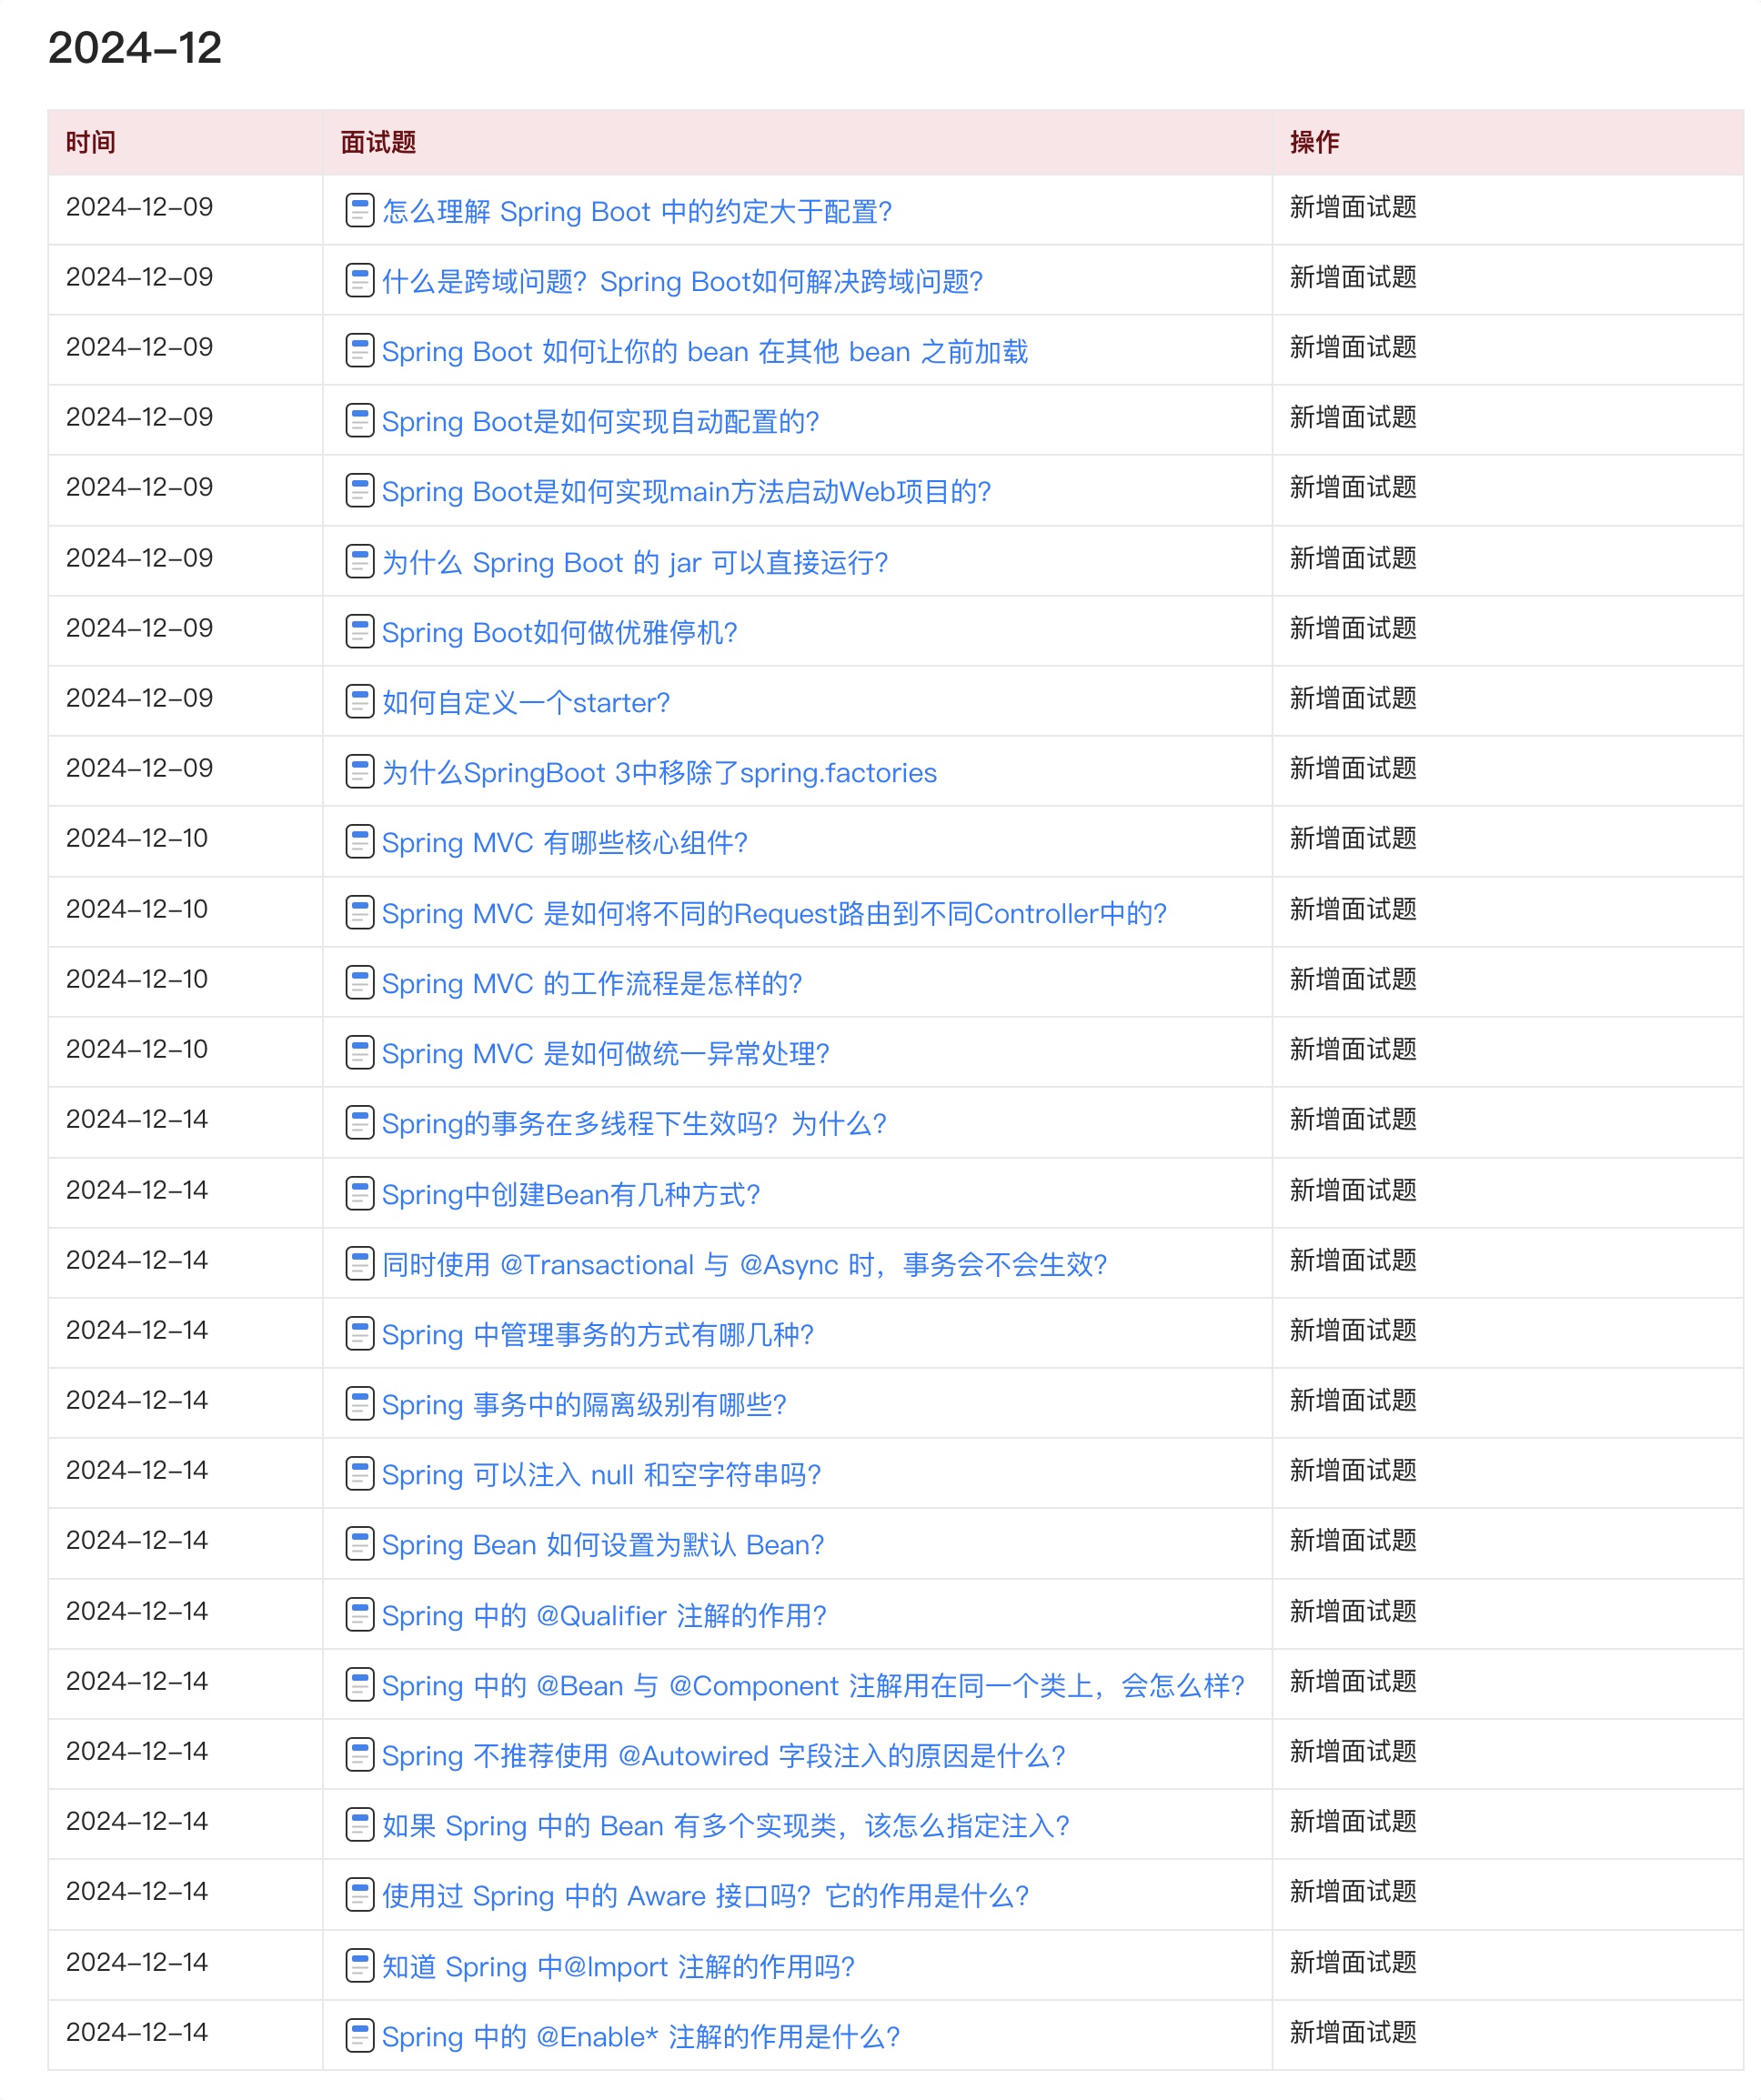
目前 Java 面试宝典累计更新 400+ 道,总字数 42w+。大明哥还在持续更新中,下图是大明哥在 2024-12 月份的更新情况:
想了解详情的小伙伴,扫描下面二维码加大明哥微信【daming091】咨询

同时,大明哥也整理一套目前市面最常见的热点面试题。微信搜[大明哥聊 Java]或扫描下方二维码关注大明哥的原创公众号[大明哥聊 Java] ,回复【面试题】 即可免费领取。