项目结构
整体项目结构与环境搭建,我使用gradle开发,视频中是maven。且我使用的各种jar版本是spring boot2的
刚开始这里项目结构没有认真看视频,在开发完demo项目之后
发现依赖browser项目,定义的安全配置完全不生效。
这里重新来认真学习下分模块。
所以如果在demo里面的笔记有关依赖相关的以这里为主。问题也不大
- spring-security # 根目录
- security-app # app相关特定代码
- spring-browser # 浏览器完全特定代码
- spring-core # 核心业务逻辑
- security-demo # 用来写例子,最开始的restfull相关的几节课程都是在该项目中编写讲解的;引用core的依赖配置
依赖关系为:
demo 依赖 browser和app
browser和app 依赖core
这里提前说下:使用idea或则spring.io界面话创建项目的话会自动创建下面的所说的内容。
这里只是记录这个内容从哪里来的
依赖基础知识
该页面start处,会给出一个示例如下所示,这个是针对gradle的;
该配置的作用是:管理版本依赖,在写spring相关jar包依赖的时候可以不用写版本号,防止冲突,由这个配置来管理
    buildscript {
        repositories {
            jcenter()
        }
        dependencies {
            classpath 'io.spring.gradle:dependency-management-plugin:1.0.0.RELEASE'
        }
    }

    apply plugin: 'io.spring.dependency-management'

    dependencyManagement {
        imports {
            mavenBom 'io.spring.platform:platform-bom:Cairo-SR3'
        }
    }
spring cloud : https://projects.spring.io/spring-cloud/#quick-start
    buildscript {
        ext {
            springBootVersion = '2.0.1.RELEASE'
        }
        repositories {
            mavenCentral()
        }
        dependencies {
            classpath("org.springframework.boot:spring-boot-gradle-plugin:${springBootVersion}")
        }
    }

    apply plugin: 'java'
    apply plugin: 'spring-boot'

    dependencyManagement {
      imports {
        mavenBom ':spring-cloud-dependencies:Finchley.SR1'
      }
    }

    dependencies {
        compile ':spring-cloud-starter-config'
        compile ':spring-cloud-starter-eureka'
    }
开始项目配置
spring-security/settings.gradle
    rootProject.name = 'spring-security'
    include 'security-app'
    include 'security-browser'
    include 'security-core'
    include 'security-demo'
spring-security/build.gradle
    buildscript {
        ext {
            springBootVersion = '2.0.3.RELEASE'
        }
        repositories {
            maven { url 'https://repo.spring.io/libs-snapshot' }
            mavenCentral()
        }
        dependencies {
            classpath("org.springframework.boot:spring-boot-gradle-plugin:${springBootVersion}")
        }
    }

    // 所有项目都配置
    allprojects {
        apply plugin: 'java'
        apply plugin: 'idea'
        apply plugin: 'eclipse'
        apply plugin: 'io.spring.dependency-management'

        group = 'cn.mrcode.imooc.springsecurity'
        version = '0.0.1-SNAPSHOT'
        sourceCompatibility = 1.8
    }

    // 所有子项目都配置
    subprojects {
        buildscript {
            ext {
                springBootVersion = '2.0.3.RELEASE'
            }
            repositories {
                mavenCentral()
            }
            dependencies {
                classpath("org.springframework.boot:spring-boot-gradle-plugin:${springBootVersion}")
            }
        }

        apply plugin: 'org.springframework.boot'


        repositories {
            // 增加n多数据源,加快下载速度
            maven { url "http://maven.aliyun.com/nexus/content/groups/public" }
            maven { url 'https://repo.spring.io/libs-snapshot' }
            maven { url "https://maven.repository.redhat.com/ga/" }
            maven { url "http://maven.nuiton.org/nexus/content/groups/releases/" }
            maven { url "https://repository.cloudera.com/artifactory/cloudera-repos/" }
            mavenCentral()
        }


        ext {
            springCloudVersion = 'Finchley.RELEASE'
        }

        dependencies {
            testCompile('org.springframework.boot:spring-boot-starter-test')
        }

        dependencyManagement {
            // 这个可能是一个补充还是第三方的依赖版本管理,在配置core的时候会用到这个配置
            imports {
                mavenBom 'io.spring.platform:platform-bom:Cairo-SR3'
            }
            // 管理spring大部分配置的依赖版本
            imports {
                mavenBom "org.springframework.cloud:spring-cloud-dependencies:${springCloudVersion}"
            }
        }
    }
security-core/build.gradle
    dependencies {
        testCompile('org.springframework.boot:spring-boot-starter-test')
        // security自动配置
        // 以及包含了 security 、spring-security-oauth2-autoconfigure 、spring-boot-starter-actuator
        // 包含了  spring-boot-starter-web
        // security 5+ 去掉了可以在配置文件中关闭security的配置,所以这里在视频中配置关闭的时候
        // 我们在这里注释掉依赖就可以了
        // compile('org.springframework.cloud:spring-cloud-starter-security')
        // redis自动配置
        compile('org.springframework.boot:spring-boot-starter-data-redis')
        // jdbc数据库数据库
        compile('org.springframework.boot:spring-boot-starter-jdbc')
        // 在本环境中会引用 5.1.46这个包
        runtime('mysql:mysql-connector-java')

        // 切面依赖
        compile("org.springframework.boot:spring-boot-starter-aop")

        // ~commons工具包==========================
        compile('org.apache.commons:commons-lang3')
        // 打开idea 右侧的gradle面板可以看到默认依赖了collections 3.2.2
        // 在maven仓库页面看到依赖可以升级为collections4:4.2
        compile('commons-beanutils:commons-beanutils')
        compile('commons-io:commons-io')
        // 这个配置没有版本号被之前引入的spring的依赖插件管理,所以需要自己手动增加
        compile('org.apache.commons:commons-collections4:4.2')

        // ~ org.springframework.social 第三方登录qq登录,微信登录等==========================
        compile('org.springframework.social:spring-social-config')
        compile('org.springframework.social:spring-social-security')
        compile('org.springframework.social:spring-social-web')
    }
security-browser/build.gradle
    dependencies {
        compile project(':security-core')
        // 该项目用来做浏览器端的所以需要有session
        // 提供集群环境下的session管理,也没有被管理到,需要自己添加
        //如果在启动的时候报错,可以通过配置 yml文件中 spring: session: store-type: none 关闭
    //    compile('org.springframework.session:spring-session:1.3.3.RELEASE')
    }
security-app/build.gradle
    dependencies {
        compile project(':security-core')
    }
security-demo/build.gradle
    dependencies {
        compile project(':security-browser')
    }
Hello Word
编写入口启动类
com.example.demo.DemoApplication
    @SpringBootApplication
    @RestController
    public class DemoApplication {

        public static void main(String[] args) {
            SpringApplication.run(DemoApplication.class, args);
        }

        @GetMapping("/hello")
        public String hello() {
            return "hello spring security";
        }
    }
启动会发现报错了。
    ***************************
    APPLICATION FAILED TO START
    ***************************

    Description:

    Failed to configure a DataSource: 'url' attribute is not specified and no embedded datasource could be configured.

    Reason: Failed to determine a suitable driver class


    Action:

    Consider the following:
        If you want an embedded database (H2, HSQL or Derby), please put it on the classpath.
        If you have database settings to be loaded from a particular profile you may need to activate it (no profiles are currently active).
发现报错的是 datasource的错误
这是因为在 core项目中添加了 compile('org.springframework.boot:spring-boot-starter-jdbc') jdbc的自动配置依赖
配置好数据源
application.yml
    spring:
      datasource:
        driver-class-name: com.mysql.jdbc.Driver
        url: jdbc:mysql://127.0.0.1:3306/imooc-demo?useUnicode=yes&characterEncode=utf-8
        username: root
        password: 123456
因为这篇笔记中的项目依赖重新看视频弄过,如果报错以下类容;看消息最下面的也会发现是因为数据库相关的配置不存在;
* 即使是在core中application.yml中配置了数据源,也不会被demo所继承使用*
Error starting Tomcat context. Exception: org.springframework.beans.factory.BeanCreationException. Message: Error creating bean with name 'servletEndpointRegistrar' defined in class path resource [org/springframework/boot/actuate/autoconfigure/endpoint/web/ServletEndpointManagementContextConfiguration$WebMvcServletEndpointManagementContextConfiguration.class]: Bean instantiation via factory method failed; nested exception is org.springframework.beans.BeanInstantiationException: Failed to instantiate [org.springframework.boot.actuate.endpoint.web.ServletEndpointRegistrar]: Factory method 'servletEndpointRegistrar' threw exception; nested exception is org.springframework.beans.factory.BeanCreationException: Error creating bean with name 'healthEndpoint' defined in class path resource [org/springframework/boot/actuate/autoconfigure/health/HealthEndpointConfiguration.class]: Bean instantiation via factory method failed; nested exception is org.springframework.beans.BeanInstantiationException: Failed to instantiate [org.springframework.boot.actuate.health.HealthEndpoint]: Factory method 'healthEndpoint' threw exception; nested exception is org.springframework.beans.factory.BeanCreationException: Error creating bean with name 'org.springframework.boot.actuate.autoconfigure.jdbc.DataSourceHealthIndicatorAutoConfiguration': Bean instantiation via constructor failed; nested exception is org.springframework.beans.BeanInstantiationException: Failed to instantiate [org.springframework.boot.actuate.autoconfigure.jdbc.DataSourceHealthIndicatorAutoConfiguration$$EnhancerBySpringCGLIB$$80a065e2]: Constructor threw exception; nested exception is org.springframework.beans.factory.BeanCreationException: Error creating bean with name 'dataSource': Post-processing of FactoryBean's singleton object failed; nested exception is org.springframework.beans.factory.BeanCreationException: Error creating bean with name 'scopedTarget.dataSource' defined in class path resource [org/springframework/boot/autoconfigure/jdbc/DataSourceConfiguration$Hikari.class]: Bean instantiation via factory method failed; nested exception is org.springframework.beans.BeanInstantiationException: Failed to instantiate [com.zaxxer.hikari.HikariDataSource]: Factory method 'dataSource' threw exception; nested exception is org.springframework.boot.autoconfigure.jdbc.DataSourceProperties$DataSourceBeanCreationException: Failed to determine a suitable driver class
关于依赖项目没有被扫描到的问题
该问题在讲解security-browser项目的时候会遇到
比如demo的依赖的browser的项目,启动demo后,发现security-browser中配置的MyUserDetailsService没有被扫描到,包括定义的测试api都没有生效
目前百度了下这样解决
    @SpringBootApplication
    @RestController
    @EnableSwagger2
    public class DemoApplication {

        public static void main(String[] args) {
            Class[] applications = new Class[2];
            // 把SecurityBrowserApplication也加入运行配置
            applications[0] = SecurityBrowserApplication.class;
            applications[1] = DemoApplication.class;
            SpringApplication.run(applications, args);
        }
对所有项目增加该配置,解决依赖模块项目打包失败的问题
如果在上面那样写了依赖别的项目的启动类,如果没有配置下面的配置,那么打包会提示找不到符号
    //这里一定得要。在多模块下,不然编译失败,因为不会把信赖模块给打包。
    // 解决依赖模块项目打包失败的问题
    jar {
        enabled = true
    }
不能扫描子包问题解决方案二:
    // 参考资料:https://blog.csdn.net/l1h2l3/article/details/73484806
    // 写上你要扫描的子包路径
    @SpringBootApplication(scanBasePackages={"com.example.demo","cn.mrcode.imooc.springsecurity.securitybrowser"})
Java 面试宝典是大明哥全力打造的 Java 精品面试题,它是一份靠谱、强大、详细、经典的 Java 后端面试宝典。它不仅仅只是一道道面试题,而是一套完整的 Java 知识体系,一套你 Java 知识点的扫盲贴。
它的内容包括:
- 大厂真题:Java 面试宝典里面的题目都是最近几年的高频的大厂面试真题。
- 原创内容:Java 面试宝典内容全部都是大明哥原创,内容全面且通俗易懂,回答部分可以直接作为面试回答内容。
- 持续更新:一次购买,永久有效。大明哥会持续更新 3+ 年,累计更新 1000+,宝典会不断迭代更新,保证最新、最全面。
- 覆盖全面:本宝典累计更新 1000+,从 Java 入门到 Java 架构的高频面试题,实现 360° 全覆盖。
- 不止面试:内容包含面试题解析、内容详解、知识扩展,它不仅仅只是一份面试题,更是一套完整的 Java 知识体系。
- 宝典详情:https://www.yuque.com/chenssy/sike-java/xvlo920axlp7sf4k
- 宝典总览:https://www.yuque.com/chenssy/sike-java/yogsehzntzgp4ly1
- 宝典进展:https://www.yuque.com/chenssy/sike-java/en9ned7loo47z5aw
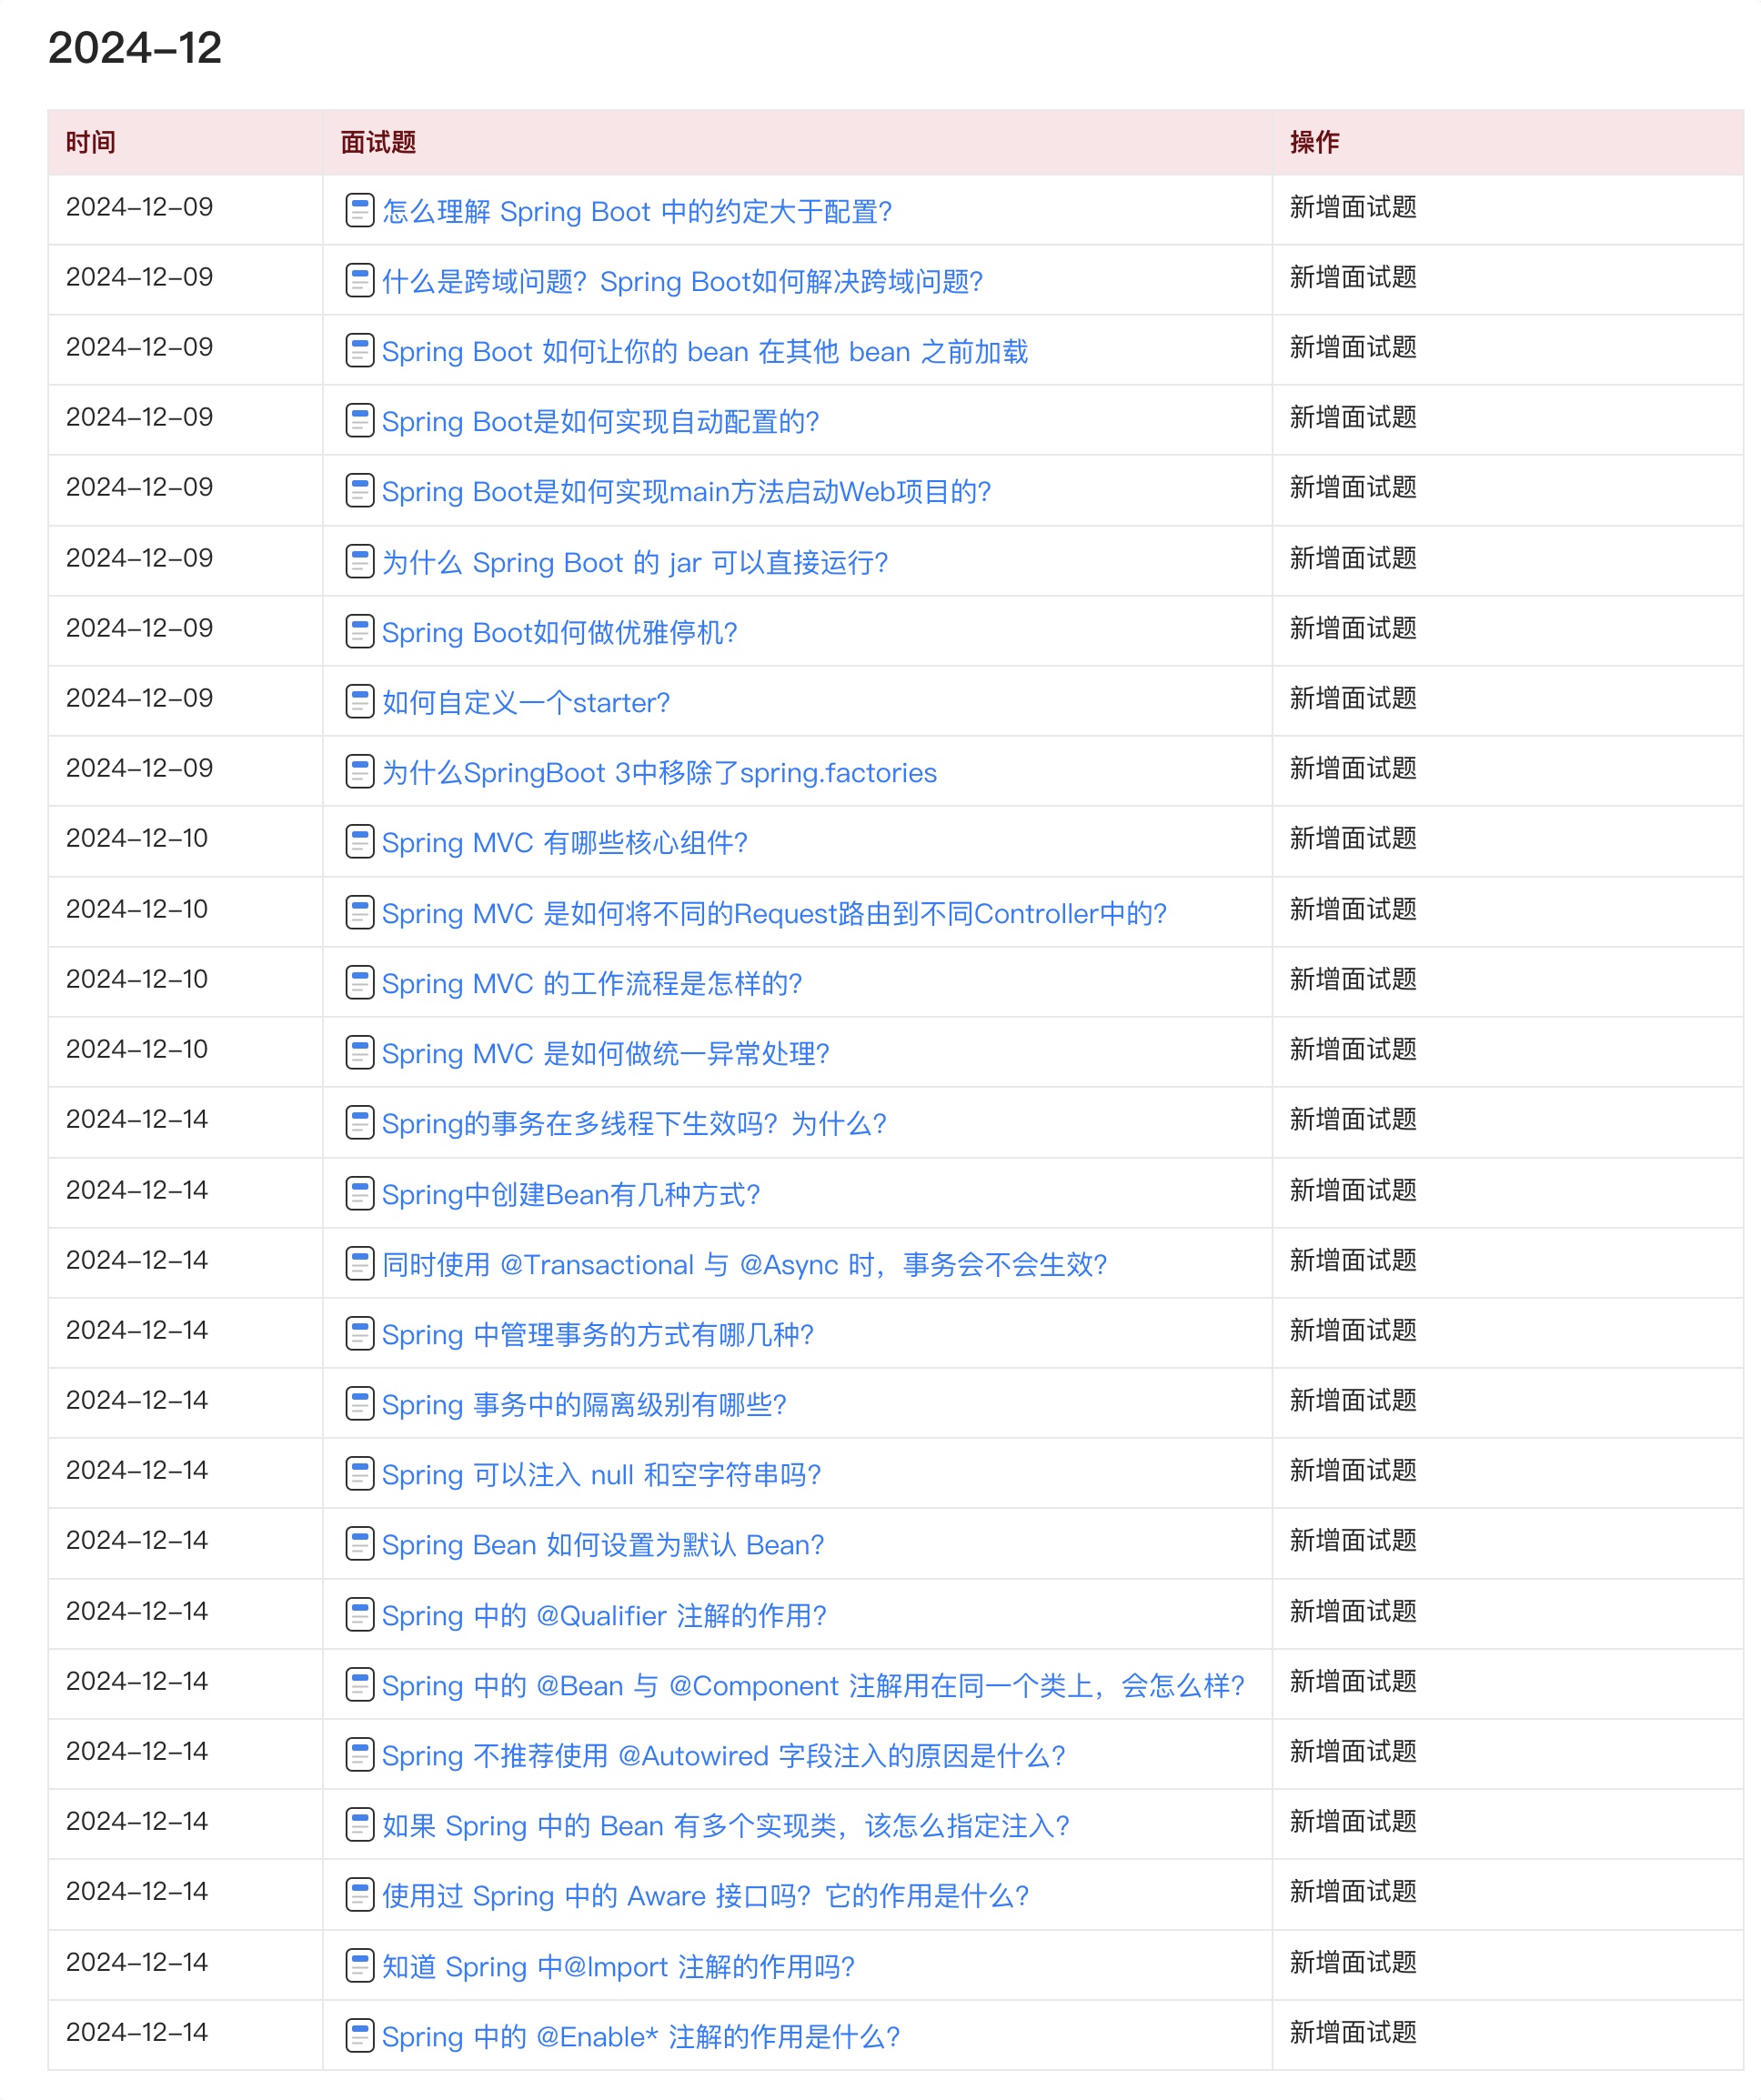
目前 Java 面试宝典累计更新 400+ 道,总字数 42w+。大明哥还在持续更新中,下图是大明哥在 2024-12 月份的更新情况:
想了解详情的小伙伴,扫描下面二维码加大明哥微信【daming091】咨询

同时,大明哥也整理一套目前市面最常见的热点面试题。微信搜[大明哥聊 Java]或扫描下方二维码关注大明哥的原创公众号[大明哥聊 Java] ,回复【面试题】 即可免费领取。