CompositeByteBuf
简单来说就是各种缓冲区的组合,就是把他们封装到一个缓冲区,或者合并成一个缓冲区。最常见的比如HTTP的一些头信息封装在一个缓冲区,消息体在另一个。或者你自己定义一个协议,比如可以分成好几个缓冲区。我们先来看下他的结构:

可以看到他还实现了一个迭代器接口,其实就是希望用迭代器的方式来遍历里面的缓冲区,我们还是来看下他的原理吧。
内部结构
我们知道可以把缓冲区放进去,那他里面到底是怎么放的,为什么我前面说他会合并,我先来画个图吧。

大致这个样子的,里面有个Component数组,Component里面放着缓冲区,还有各种索引。外部操作好像是只操作了CompositeByteBuf,其实具体是操作Component中的缓冲区。所以我们先来看下Component里面放了什么。
Component
首先是一些属性,里面很重要的是索引offset和endOffset,这个表示当前缓冲区相对于整个CompositeByteBuf可以读取的范围,比如说有三个缓冲区,每个缓冲区只写了10个字节,那第一个缓冲区的索引就是0-9,第二个是10-19,第三个是20-29,这个好理解吧,其实就相当于数组下标。还有srcAdjustment和adjustment,就是相对于CompositeByteBuf的起始索引的读索引偏移,大多数是负的,因为这样直接获取CompositeByteBuf索引的值的时候,可以直接定位到buf里的读索引位置,后面会讲到。其他的理解起来也不难。
     		final ByteBuf srcBuf; //原始的,传进来是什么就是什么
            final ByteBuf buf; //去掉包装的,传进来的可能是包装后的缓冲区,要把包装脱了

            int srcAdjustment; // 相对于srcBuf,CompositeByteBuf的起始索引,读索引的偏移
            int adjustment; // 相对于buf,CompositeByteBuf的起始索引,读索引的偏移

            int offset; // 相对于CompositeByteBuf的起始索引
            int endOffset; // 相对于CompositeByteBuf的结束索引

            private ByteBuf slice; // 缓存切片
构造方法

主要方法
            //源缓冲区索引
            int srcIdx(int index) {
                return index + srcAdjustment;
            }
            //脱了包装后的缓冲区索引
            int idx(int index) {
                return index + adjustment;//索引+偏移,直接获取读索引位置
            }
    //存在的可读字节
            int length() {
                return endOffset - offset;
            }
            //调整索引,在CompositeByteBuf内的相对位置
            void reposition(int newOffset) {
                int move = newOffset - offset;
                endOffset += move;
                srcAdjustment -= move;
                adjustment -= move;
                offset = newOffset;
            }
            //把buf的内容拷贝到dst中
            // copy then release
            void transferTo(ByteBuf dst) {
                dst.writeBytes(buf, idx(offset), length());
                free();
            }


            //释放缓冲区
            void free() {
                slice = null;
                srcBuf.release();
            }
其中reposition可能不好理解,我先简单的画个图,有两个Component,对应两个堆内缓冲区的字节数组,每个缓冲区写了5个字节,Component1的缓冲区读了1个,Component2的缓冲区读了2个:

CompositeByteBuf重要属性
其实大多是就是这有两个。
      	private int componentCount;//数组里有多少个组件存在,也当做添加组件时候的下标用的
        private Component[] components; // 组件数组
CompositeByteBuf构造方法
接下来我们就准备向CompositeByteBuf添加缓冲区,看看里面做了什么,首先来看看这个构造方法。


主要就是进行Component数组的创建,默认是16个。
addComponent(ByteBuf buffer)
看看添加方法:
        public CompositeByteBuf addComponent(ByteBuf buffer) {
            return addComponent(false, buffer);
        }
        //increaseWriterIndex就是是否增加写索引,如果不增加的话,是写索引是0,是没办法用readByte()读的
         public CompositeByteBuf addComponent(boolean increaseWriterIndex, ByteBuf buffer) {
            return addComponent(increaseWriterIndex, componentCount, buffer);
        }
        public CompositeByteBuf addComponent(boolean increaseWriterIndex, int cIndex, ByteBuf buffer) {
            checkNotNull(buffer, "buffer");
            addComponent0(increaseWriterIndex, cIndex, buffer);
            consolidateIfNeeded();
            return this;
        }
addComponent0
这里是关键,主要会先创建Component ,创建的时候会把包装的缓冲区去掉包装,然后根据读索引,可读长度等数据封装成Component,然后添加到components数组中,这个时候可能会涉及扩容,和数组的拷贝,因为你添加的索引可能是在中间,这样就需要两边拷贝到新数组中了。之后如果是中间插入的,还需要进行索引后面的组件的索引更新。如果是最后插入,要根据前一个组件索引进行索引更新,为什么初始化后了还要更新索引呢,因为他的索引初始化的时候一般是根据缓冲区内部偏移来设置的,如果要相对于CompositeByteBuf来说,就需要偏移的更新了。
    private int addComponent0(boolean increaseWriterIndex, int cIndex, ByteBuf buffer) {
            assert buffer != null;
            boolean wasAdded = false;
            try {
                checkComponentIndex(cIndex);//检查缓冲区是否可用和越界

                // No need to consolidate - just add a component to the list.
                Component c = newComponent(ensureAccessible(buffer), 0);//创建新组件
                int readableBytes = c.length();//获取新组件的可读字节

                addComp(cIndex, c);//添加新组件到指定索引
                wasAdded = true;//添加成功
                if (readableBytes > 0 && cIndex < componentCount - 1) {//有可读,且插入索引在中间位置
                    updateComponentOffsets(cIndex);//调整组件的偏移量
                } else if (cIndex > 0) {//插入索引不是第一个索引,且不是插入到中间
                    c.reposition(components[cIndex - 1].endOffset);//根据上一个endOffset进行一些索引调整
                }
                if (increaseWriterIndex) {
                    writerIndex += readableBytes;//增加写索引
                }
                return cIndex;
            } finally {
                if (!wasAdded) {//添加失败就直接释放了
                    buffer.release();
                }
            }
        }
newComponent
会先获取源缓冲区buf的读索引和可读长度,然后将buf的包装去掉,获得去掉后unwrapped 的读索引unwrappedIndex ,最后创建组件Component。
     private Component newComponent(final ByteBuf buf, final int offset) {
            final int srcIndex = buf.readerIndex();
            final int len = buf.readableBytes();

            // unpeel any intermediate outer layers (UnreleasableByteBuf, LeakAwareByteBufs, SwappedByteBuf)
            ByteBuf unwrapped = buf;
            int unwrappedIndex = srcIndex;
            while (unwrapped instanceof WrappedByteBuf || unwrapped instanceof SwappedByteBuf) {
                unwrapped = unwrapped.unwrap();//剥离外层,获取最原始的缓冲区
            }

            // unwrap if already sliced
            if (unwrapped instanceof AbstractUnpooledSlicedByteBuf) {
                unwrappedIndex += ((AbstractUnpooledSlicedByteBuf) unwrapped).idx(0);
                unwrapped = unwrapped.unwrap();
            } else if (unwrapped instanceof PooledSlicedByteBuf) {
                unwrappedIndex += ((PooledSlicedByteBuf) unwrapped).adjustment;
                unwrapped = unwrapped.unwrap();
            } else if (unwrapped instanceof DuplicatedByteBuf || unwrapped instanceof PooledDuplicatedByteBuf) {
                unwrapped = unwrapped.unwrap();
            }

            // We don't need to slice later to expose the internal component if the readable range
            // is already the entire buffer 如果可读范围就是容量的话,就可以返回切片,合并后的缓冲区就会有切片
            final ByteBuf slice = buf.capacity() == len ? buf : null;
            //大端
            return new Component(buf.order(ByteOrder.BIG_ENDIAN), srcIndex,
                    unwrapped.order(ByteOrder.BIG_ENDIAN), unwrappedIndex, offset, len, slice);
        }
addComp
这里就要将组件插入到组件数组相应的位置,默认当然是最后一个位置,也就是componentCount。
        private void addComp(int i, Component c) {
            shiftComps(i, 1);//腾出索引处的位置,超出数组大小就要扩容
            components[i] = c;//放入数组
        }
shiftComps
插入新的组件,可能是中间位置,那就需要腾出这个位置,也可能是最后,也可能要扩容。
      private void shiftComps(int i, int count) {
            final int size = componentCount, newSize = size + count;
            assert i >= 0 && i <= size && count > 0;
            if (newSize > components.length) {//需要扩容 扩到现有组件个数的1.5倍 或者新尺寸大小
                // grow the array
                int newArrSize = Math.max(size + (size >> 1), newSize);
                Component[] newArr;//新数组
                if (i == size) {//如果插入到最后,扩容到newArrSize,然后把原来的拷贝过去,浅拷贝
                    newArr = Arrays.copyOf(components, newArrSize, Component[].class);
                } else {//插入到中间,扩容且需要腾出索引位置
                    newArr = new Component[newArrSize];
                    if (i > 0) {//i索引之前的拷贝到newArr 从0索引到i 拷贝i个
                        System.arraycopy(components, 0, newArr, 0, i);
                    }
                    if (i < size) {//i索引之后的拷贝到newArr 从i+count索引到最后 拷贝siez-i个
                        System.arraycopy(components, i, newArr, i + count, size - i);
                    }
                }
                components = newArr;//新数组
            } else if (i < size) {//不需要扩容,只需要把i索引以及之后的往后移count位
                System.arraycopy(components, i, components, i + count, size - i);
            }
            componentCount = newSize;//更新组件个数
        }
基本的步骤我已经注释了,就看要不要扩容。
- 要扩容的话,就扩容,一般时候
1.5倍原来大小,如果插入是最后,那就直接扩容拷贝到新数组里,如果不是插入是中间的话,需要把前后的元素分别拷贝到新数组的位置上,留出要插入的索引位置,最后插入。 - 如果不扩容,默认插入位置就是最后,否则的话需要把位置所在元素以及后面的往后移动,把位置腾出来,后面放入。
要注意这里的数组拷贝Arrays.copyOf和System.arraycopy全是浅拷贝,只是拷贝引用 。
画几个图示意下吧。
插入到最后,没扩容:

插入到最后,扩容:

插入到中间,不扩容:

插入到中间,扩容:

updateComponentOffsets
如果是有可读数据,且插入在中间位置的,就需要更新位置以及后面的组件的索引,因为被插队了嘛,偏移就变了。
    private void updateComponentOffsets(int cIndex) {
            int size = componentCount;
            if (size <= cIndex) {
                return;
            }
            //获取前一个组件的endOffset
            int nextIndex = cIndex > 0 ? components[cIndex - 1].endOffset : 0;
            for (; cIndex < size; cIndex++) {//更新cIndex及之后的所有偏移
                Component c = components[cIndex];
                c.reposition(nextIndex);//根据前一个的endOffset来更新偏移
                nextIndex = c.endOffset;
            }
        }
其实就是根据前一个组件的索引endOffset来更新:

consolidateIfNeeded
这个就是整合啦,也就是我说的可能会合并里面的缓冲区。如果组件的个数大于设置的最大个数,默认16,就会开始合并啦,其实也就是一次扩容后,会开始整合。
      private void consolidateIfNeeded() {
            // Consolidate if the number of components will exceed the allowed maximum by the current
            // operation.
            int size = componentCount;
            if (size > maxNumComponents) {
                consolidate0(0, size);//从头开始整合成一个
            }
        }
consolidate0
传入参数就是从哪个索引开始整合,整合多少个。首先计算组件里可读的字节数,然后创建一个新的缓冲区,默认是堆内缓冲区,因为只有当所有缓冲区都是直接缓冲区的时候,才算是直接缓冲区,否则有一个是堆内的,就算是堆内缓冲区。然后遍历这些组件,把他们的可读数据转移到新建的缓冲区里,最后把他们删除,将新的缓冲区封装成组件,然后可能还要更新索引。
     private void consolidate0(int cIndex, int numComponents) {
            if (numComponents <= 1) {
                return;
            }

            final int endCIndex = cIndex + numComponents;
            final int startOffset = cIndex != 0 ? components[cIndex].offset : 0;
            final int capacity = components[endCIndex - 1].endOffset - startOffset;//计算所有组件的总字节容量
            final ByteBuf consolidated = allocBuffer(capacity);//创建一个合并缓冲区,准备将组件里的缓冲区数据写进来

            for (int i = cIndex; i < endCIndex; i ++) {
                components[i].transferTo(consolidated);//将组件中的数据写入合并缓冲区
            }
            lastAccessed = null;
            removeCompRange(cIndex + 1, endCIndex);//删除全部,留下第一个
            components[cIndex] = newComponent(consolidated, 0);//将合并后的缓冲区重新封装成一个组件
            if (cIndex != 0 || numComponents != componentCount) {//不是从头开始整合,或者整合的数量不是所有数量
                updateComponentOffsets(cIndex);//更新之后所有组件的的索引信息
            }
        }
            void transferTo(ByteBuf dst) {
                dst.writeBytes(buf, idx(offset), length());
                free();
            }
removeCompRange
删除范围内的组件,其实就是如果结束索引不是最后索引,就把结束索引后的组件往前移,然后把后面剩下的全清空。
    private void removeCompRange(int from, int to) {
            if (from >= to) {
                return;
            }
            final int size = componentCount;
            assert from >= 0 && to <= size;
            if (to < size) {//如果索引+1的位置小于总组件数,把索引后面的元素复制到前面来即可
                System.arraycopy(components, to, components, from, size - to);
            }
            int newSize = size - to + from;//计算剩下的个数
            for (int i = newSize; i < size; i++) {
                components[i] = null;//把后面剩余的设置null
            }
            componentCount = newSize;//更新数量
        }
至此,我们知道了缓冲区是怎么添加到CompositeByteBuf里面的,当然还有删除等其他操作,后面再说吧。
好了,今天就到这里了,希望对学习理解有帮助,大神看见勿喷,仅为自己的学习理解,能力有限,请多包涵。
Java 面试宝典是大明哥全力打造的 Java 精品面试题,它是一份靠谱、强大、详细、经典的 Java 后端面试宝典。它不仅仅只是一道道面试题,而是一套完整的 Java 知识体系,一套你 Java 知识点的扫盲贴。
它的内容包括:
- 大厂真题:Java 面试宝典里面的题目都是最近几年的高频的大厂面试真题。
- 原创内容:Java 面试宝典内容全部都是大明哥原创,内容全面且通俗易懂,回答部分可以直接作为面试回答内容。
- 持续更新:一次购买,永久有效。大明哥会持续更新 3+ 年,累计更新 1000+,宝典会不断迭代更新,保证最新、最全面。
- 覆盖全面:本宝典累计更新 1000+,从 Java 入门到 Java 架构的高频面试题,实现 360° 全覆盖。
- 不止面试:内容包含面试题解析、内容详解、知识扩展,它不仅仅只是一份面试题,更是一套完整的 Java 知识体系。
- 宝典详情:https://www.yuque.com/chenssy/sike-java/xvlo920axlp7sf4k
- 宝典总览:https://www.yuque.com/chenssy/sike-java/yogsehzntzgp4ly1
- 宝典进展:https://www.yuque.com/chenssy/sike-java/en9ned7loo47z5aw
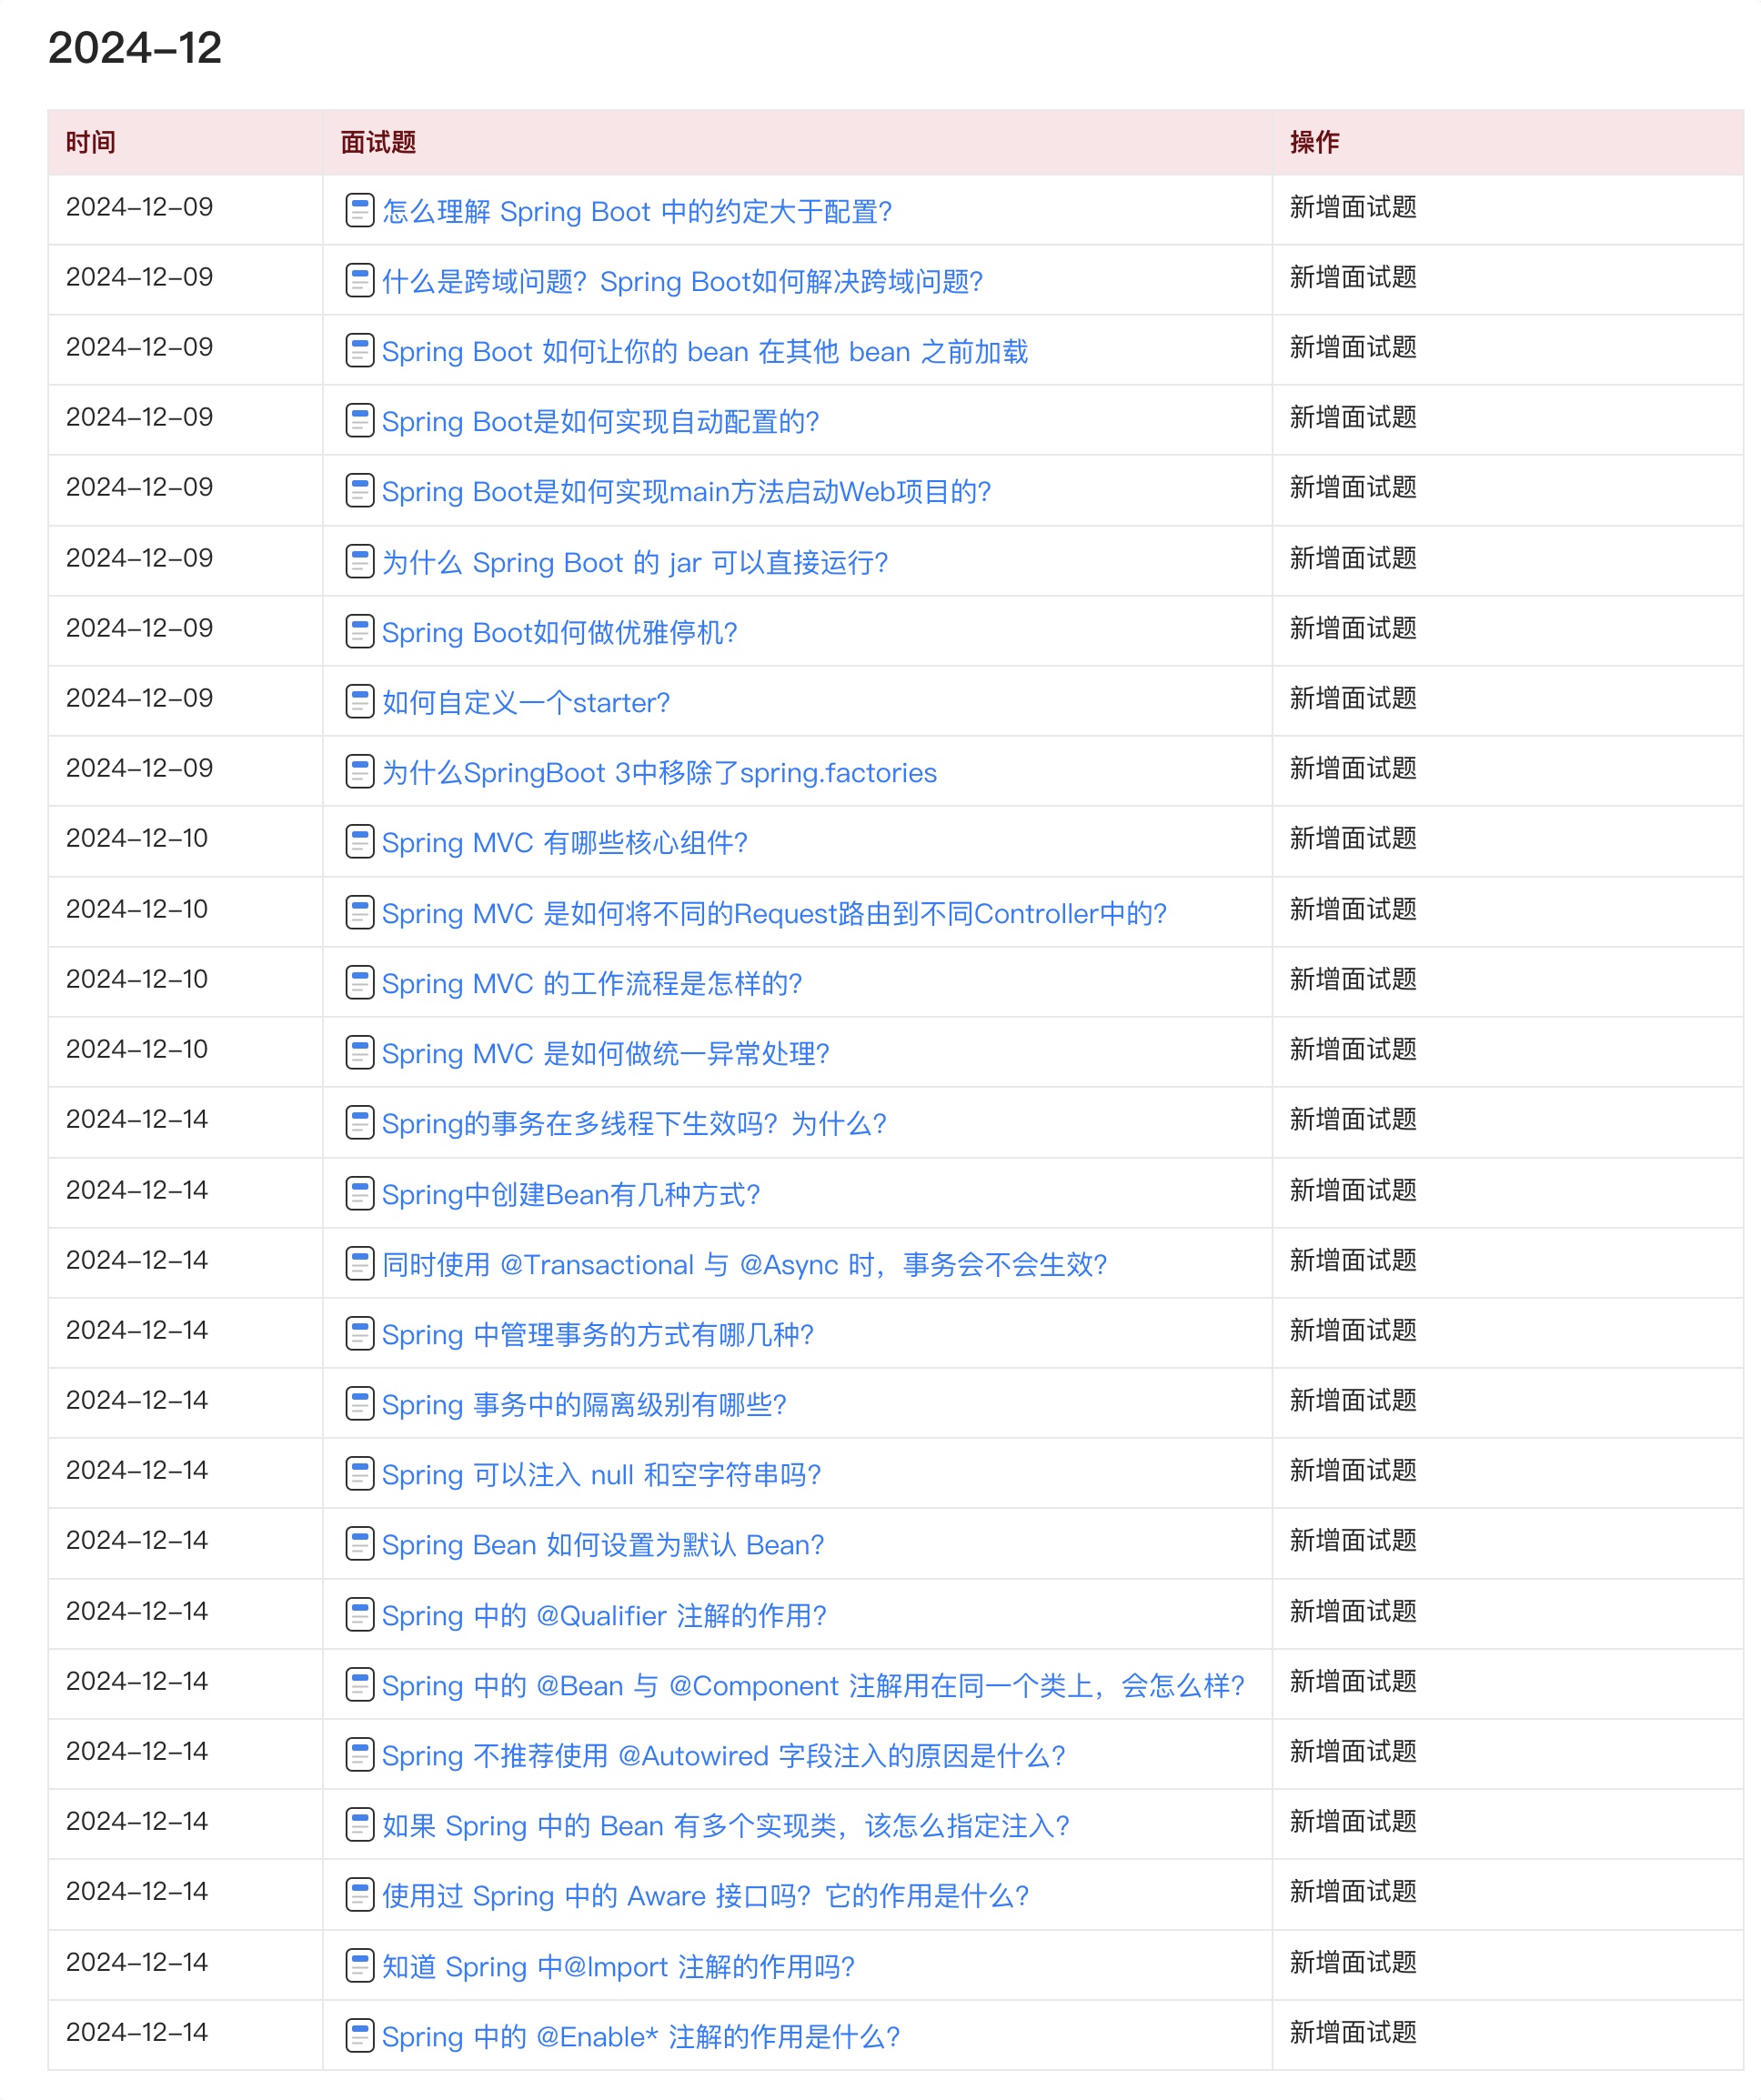
目前 Java 面试宝典累计更新 400+ 道,总字数 42w+。大明哥还在持续更新中,下图是大明哥在 2024-12 月份的更新情况:
想了解详情的小伙伴,扫描下面二维码加大明哥微信【daming091】咨询

同时,大明哥也整理一套目前市面最常见的热点面试题。微信搜[大明哥聊 Java]或扫描下方二维码关注大明哥的原创公众号[大明哥聊 Java] ,回复【面试题】 即可免费领取。